Showing posts with label diy. Show all posts

Wednesday, August 28, 2013

A Work in Progress

My boys room has been a constant work in progress. Renting is so hard when trying to really make a place your own. I LOVE color and not being able to paint makes it so I have to fill the room with color in other ways. 
I made their bedding about a year and a half ago and used the fabrics as my 'pallet' to go from on colors. I LOVE strip quilts and I still love these blankets! I made them large enough to move to full beds if/when the time comes. (All the furniture is gel stained, you can find the FULL tutorial in our DIY tab) 
 I finally got it how I wanted but felt it needed just a little something so I added vinyl polka-dots to the walls. 
also made them each a subway art hanging of their names. I just got clearance art boxes from Hobby Lobby-they are actually pink and purple-and painted them and did vinyl for the subway art.     
I bought cheap curtains because we use a pull down black out shade so they were more for decoration. I them used fabric paint to put chevron navy strips on them. That was a fun project but a word to the wise-get LOTS of paint. I wish my strips all had one more coat of paint because they are a little see through on spots...
I made these canvases a few years ago when Brecken was little and had a beach shack theme room. It still 'sort-of' is...I used a vinyl cutting and put it on white canvas and then painted what was showing. I found similar ones shortly after I did these at Pottery Barn for $30 EACH!!! I did these for $4 each! 
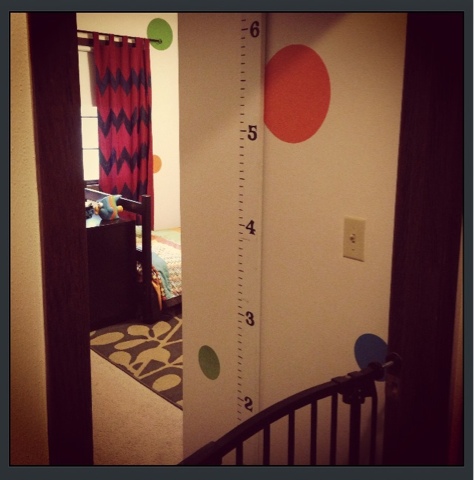
I've always wanted a 'growth chart' that could move with us from house to house as we finish school. So I got a 5 ft 4x1, painted it white and put vinyl #'s 2-6 on it and hang it 1.5 ft high from the ground and put the lines so they start at 18 inches. Now we just measure them once a year and use a small fine point sharpie to mark it! 
Can you tell we LOVE books?! I feel like books are one of the best things to have in our home. Brecken learned to read just after he turned 4 and has read all of these at least 3 times each. (We have another book case in the hall outside their room too...I'm obsessed) I'm also in LOVE with our 'Rules to always being a gentlemen' it was a printable that I put on canvas using a groupon at a some online canvas place. 
I'm sure I'll continue to change and add to it, but for right now it's 'done'....

Wednesday, June 5, 2013

Successful Pinterest DIY: wood repair

I didn't pin this idea from Pinterest, I just saw it awhile back and remembered it. Now I can't find it again, but here it is! If you have damaged or scratched wood mix 3/4 cup canola oil with 1/4 cup vinegar and wipe it over the scratches. Do not wipe it off, & for deep scratches let it sit for 5 minutes before becoming discouraged that it didn't work. (That one is coming from personal experience.) 
When my 5 year old was a baby he chewed his crib up...after spending $400 on a beautiful crib I was so bumbed. I had just come to terms with it and let it go when I had Oliver. I decided this morning to just try this trick to see...
It worked!!!! It looks like new! I spent 5 years sad about a ruined bed that is no longer ugly!!! The smaller dings vanished immediately, however these larger deeper ones took a few minutes to fully disappear!!! But they are now darkened and no longer noticeable!!! 
Love it when a Pinterest trick works!!!

Friday, May 31, 2013

DIY Gel Stain Tutorial

Have you ever wanted to try Gel Stain?! I have and I finally took the plunge!!! Here is a step by step how to on how to make your wood look like new!!! So I LOVE espresso colored wood and HATE yellow oak...that's just me. So when I found a bunk bed and 2 dressers for my boys on Craigslist for a steal that were ugly yellow oak and were stained and ugly, I hoped the gel stain would be an easy fix...and I was! So here we go! 
What you'll need: general finishes poly acrylic & java gel stain. You MUST get general finishes brand. I got mine on Amazon for the following prices
You will also need 6-10 men athletic socks. These can (and in my opinion should-save $) be old used ones. Just make sure they are clean. 
You will also need disposable gloves. I got cheap yellow kitchen gloves. But you will need as many pairs of gloves as you use single socks. So 6-10 pairs of gloves.
I buffed the wood with sanding block and just got all spots where the wood was uneven. I didn't sand the stains on the wood at all, just where the wood had something on it and needed flattened and smoothed. I then used cheese cloth to wipe off ALL dust. 
Here we go! 
This is before....,
I put a glove on each hand and a sock over the hand I'd apply with. Then dip in the stain and wipe on. 
Make sure not to leave gobs and to go the direction of the grain. 
Side note: this wood had the latexy coating and went on fine, on the inside of the drawers and the back of the dressers was raw wood and it soaked up the stain much faster and only needed 2 coats rather then 4. 
Here is after coat 1
Don't be discouraged if its streaky or not perfect after coats 1 & 2. It looks amazing after coat 3!! Let the gel stain dry 24 hours between coats. Do not cheat on this. I did do a 4th coat on the tops of the dressers, the faces of the drawers and the outsides of the bed posts just to get it really dark. Here is after coat 4 and before sealing it with poly acrylic. 
After the coats of gel stain let dry 72 hours. Do NOT cheat on this step either. I can NOT stress this enough. Let it DRY!!! Then using a sock apply light coats of the poly. Do NOT let it be globby. Leaving any white residue will leave a hardened white chunk on your wood. So be careful when working with any detail in the wood. Mine had no detail but I have worked with detail and poly before and you can ruin a project by not doing light layers of poly and leaving any globs. Do 2-3 coats letting each coat dry 24 hours between coats. You will end up with a BEAUTIFUL product that looks brand new!!!   
I don't have pictures of the beds yet as I am doing another tutorial in the future and you will see the beds then. But they all look this amazing!!! You can use this technique in cabinets, it furniture or anything with wood grain!!! Have fun! Enjoy! And comment with questions! We'd love to see your finished work as well!!!

Thursday, March 14, 2013

Spring Thank You

So as some of you know, I got my appendix out this weekend-I do NOT recommend this unless necessary by the way, it totally sucks. So I have LOTS of 'thank you's to hand out, & printable parties to go is having a 'peeps' contest so I figured I would do 2 things at once! The contest is until tonight so get your pics and submissions in ASAP!
So I bought some peeps. . .and some malt balls. Both of which I think are disgusting by the way. But seeings how I am not on the same page when it comes to such things as the general public I figured I'd go with popular demand. 
I also have these little "fry" cartons I got from Pick You Plum before Valentines and some washi tape to decorate them. 
TA-DA!
I think they turned out to be cute little nests! The peeps are chilling on some mini Popsicle sticks and I filled the cartons with confetti and then the malt balls. I'll wrap some cellophane around them to keep them fresh and this is what I'll be handing out to say thank you for all the meals, treats and babysitting that my friends have so graciously done for me and my family this week!
What do you think? Do you like peeps? Whats your favorite Easter candy? 
Related Posts Plugin for WordPress, Blogger...